Hi there. Is it possible to put the same Image in multiple containers, with something like „Container=Meter1, Container2=Meter2“? Thanks in advance.
Or maybe „Container=Meter1 | Meter2“?
It is currently April 27th, 2024, 11:53 pm
SOLVED: Multiple containers
-
Hagart

- Posts: 12
- Joined: October 18th, 2023, 11:44 am
 SOLVED: Multiple containers
Last edited by Hagart on December 5th, 2023, 3:02 pm, edited 1 time in total.
-
Yincognito

- Rainmeter Sage
- Posts: 7178
- Joined: February 27th, 2015, 2:38 pm
- Location: Terra Yincognita
Re: Multiple containers
No, it's not. In addition to that, containers cannot be nested (i.e. put a container into another) either, so you can't have Container=Meter1 and then in Meter1 have Container=Meter2.
That being said, if you provide a simple, clear and short description of what your actual scenario looks like and what you want to achieve, maybe there is a(nother) solution to your problem...
-
Hagart
- Posts: 12
- Joined: October 18th, 2023, 11:44 am
Re: Multiple containers
Thanks, but i just want to put a Image in more than just one container. Maybe the only solution is a second image and then put it in the other container?Yincognito wrote: ↑December 5th, 2023, 10:57 am No, it's not. In addition to that, containers cannot be nested (i.e. put a container into another) either, so you can't have Container=Meter1 and then in Meter1 have Container=Meter2.
That being said, if you provide a simple, clear and short description of what your actual scenario looks like and what you want to achieve, maybe there is a(nother) solution to your problem...
-
Yincognito
- Rainmeter Sage
- Posts: 7178
- Joined: February 27th, 2015, 2:38 pm
- Location: Terra Yincognita
Re: Multiple containers
Well, if putting a second image in another container does what you need it to do, then obviously it's a solution. It all depends on what you want to do and the behavior you expect, and since you didn't reveal anything about that, you'll have to find out for yourself if it leads to an acceptable result.
For example, there is no guarantee that overlapping two different containers will produce the expected result, especially since any transparency of both the container and the content is cumulative.
-
Hagart
- Posts: 12
- Joined: October 18th, 2023, 11:44 am
Re: Multiple containers
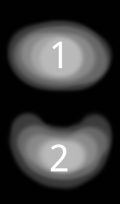
I have actually 5 images that uses this shape as a container. The container looks like this...Yincognito wrote: ↑December 5th, 2023, 11:08 am Well, if putting a second image in another container does what you need it to do, then obviously it's a solution. It all depends on what you want to do and the behavior you expect, and since you didn't reveal anything about that, you'll have to find out for yourself if it leads to an acceptable result.
[TagEllipse]
Meter=Shape
Group=Elemente
Shape=Ellipse ([SonnenBahn]*COS([ThetaSonne])+(500*#Scale#)),([SonnenBahn]*SIN([ThetaSonne])+(500*#Scale#)),(250*#Scale#),((244*#Scale#)+[SonnenBahn]) | Rotate (360/(2*PI)*[ThetaSonne]) | Fill RadialGradient MyGradient1 | StrokeWidth 0
MyGradient1=0,0,0,0,((1/255*#ElementeAlpha#)*(250*#Scale#)),((1/255*#ElementeAlpha#)*((244*#Scale#)+[SonnenBahn])) | 255,255,255,#ElementeAlpha# ; 0.3 | 255,255,255,#ElementeAlpha# ; 0.6 | 255,255,255,(#ElementeAlpha#*0.8) ; 0.7 | 255,255,255,(#ElementeAlpha#*0.6) ; 0.8 | 255,255,255,(#ElementeAlpha#*0.4) ; 0.9 | 255,255,255,0 ; 1.0
DynamicVariables=#Sterne#
UpdateDivider=#UD#
AntiAlias=1
Hidden=(1-#Sterne#)
It fades in on refresh, changes position and dimensions dynamically and contains two different maps, clouds and two other images as well. My basic intention was to make a path shape, that changes its shape (from 1 to 2, image below) instead of a ellipse, but then i realised that it is not possible to make a gradient that fills the form i need like in the exemple image below. The gradient should have the same shape as the shape. With a radial gradient it generates a too hard edge in the middle (picture 2).
...so i tried to make a detour and simulate a moonlike shape with multiple of this ellipse-shapes that separates their position and come together again (with fading transparancy, the nearer they come), i meant to put the images in all of them at the same time, if possible. Otherwise i need also to dublicate all of the images.
Or if you see a possibility to realize my first idea with a path shape like in the picture with a gradient that has the same shape, that would be great.
-
Yincognito
- Rainmeter Sage
- Posts: 7178
- Joined: February 27th, 2015, 2:38 pm
- Location: Terra Yincognita
Re: Multiple containers
Ah, I see: you want to use a free form container faded towards its edges, that transforms from a shape like 1 into a shape like 2, and masks other image(s) you may put in it.Hagart wrote: ↑December 5th, 2023, 11:36 am I have actually 5 images that uses this shape as a container. The container looks like this...
[TagEllipse]
Meter=Shape
Group=Elemente
Shape=Ellipse ([SonnenBahn]*COS([ThetaSonne])+(500*#Scale#)),([SonnenBahn]*SIN([ThetaSonne])+(500*#Scale#)),(250*#Scale#),((244*#Scale#)+[SonnenBahn]) | Rotate (360/(2*PI)*[ThetaSonne]) | Fill RadialGradient MyGradient1 | StrokeWidth 0
MyGradient1=0,0,0,0,((1/255*#ElementeAlpha#)*(250*#Scale#)),((1/255*#ElementeAlpha#)*((244*#Scale#)+[SonnenBahn])) | 255,255,255,#ElementeAlpha# ; 0.3 | 255,255,255,#ElementeAlpha# ; 0.6 | 255,255,255,(#ElementeAlpha#*0.8) ; 0.7 | 255,255,255,(#ElementeAlpha#*0.6) ; 0.8 | 255,255,255,(#ElementeAlpha#*0.4) ; 0.9 | 255,255,255,0 ; 1.0
DynamicVariables=#Sterne#
UpdateDivider=#UD#
AntiAlias=1
Hidden=(1-#Sterne#)
It fades in on refresh, changes position and dimensions dynamically and contains two different maps, clouds and two other images as well. My basic intention was to make a path shape, that changes its shape (from 1 to 2, image below) instead of a ellipse, but then i realised that it is not possible to make a gradient that fills the form i need like in the exemple image below. The gradient should habe the same shape as the shape.
...so i tried to make a detour and simulate a moonlike shape with multiple of this ellipse-shapes that separates their position and come together again (with fading transparancy, the nearer they come), i meant to put the images in all of them at the same time, if possible. Otherwise i need also to dublicate all of the images.
Or if you see a possibility to realize my first idea with a path shape like in the picture with a gradient that has the same shape, that would be great.
That's tricky, and it's not because you couldn't transform the shape like you want via a curved Path Shape meter, but because of the fading gradient that needs to follow the shape's contour / edges. The interactive quadratic curve example in the previous link illustrates how easily you could transform the contour of your overall shape just by changing the coordinates of the curve's control point accordingly (and this can be integrated in a Path Shape without any issues, you could even freely curve a segment based skeleton with some math kung fu), but unfortunately Rainmeter only has two types of gradients, linear and radial, which means you can't fade alpha towards a free form shape's edges (unless that shape is a single ellipse, of course).
So, the contour of the shape can be done in a single Path Shape meter, just not the fading gradient fill. As for putting the images in all of them at the same time, this is not needed. You could make a container meter that has all those ellipses as Shape1, Shape2, and so on (if you think about combining them, don't, because it will lead to the combined shape having the same color), and then just put whatever other images in that one container meter. The only problem remaining is the gradient / fading transparency, which can't follow the shape's contour, leading to workarounds like yours, where you simulate such an effect by having multiple ellipses colored differently.
I guess you could benefit from more design possibilities if you try some Javascript in a WebView measure, but that comes with its own drawbacks. The way I see it, the most effective way to deal with your problem is to just photoshop a set of images going from a shape like 1 to a shape like 2, then use those images as source for the container meter, with the rest of your code unchanged. This would be effective in terms of achieving the desired goal, but it may be a lengthier process to get that image editing right. Obviously, it won't be easily modifiable either, if you one day want it to look differently.
-
Hagart
- Posts: 12
- Joined: October 18th, 2023, 11:44 am
Re: Multiple containers
Thank you very much. I think the workaround with the multiple shapes is quite complicated and i will not get the results i wish. The boardes dont look nice and the problem with the transparancys and all of the additional meters is too much. Your solution with the sets of images seems to be the best solution. I will establish that as soon i got enough time for that. Thank you 
-
Yincognito
- Rainmeter Sage
- Posts: 7178
- Joined: February 27th, 2015, 2:38 pm
- Location: Terra Yincognita
Re: Multiple containers
No problem, you're welcome. Using a set of images will guarantee the result as you want it.Hagart wrote: ↑December 5th, 2023, 3:00 pm Thank you very much. I think the workaround with the multiple shapes is quite complicated and i will not get the results i wish. The boardes dont look nice and the problem with the transparancys and all of the additional meters is too much. Your solution with the sets of images seems to be the best solution. I will establish that as soon i got enough time for that. Thank you
Just for the record, a way to workaround / simulate this using multiple Shape options in the same meter is also possible if you scale those ShapeN coordinates gradually and draw them with a lower alpha (I just took the 2nd example here and applied the principle, for simplicity):
Code: Select all
[Variables]
TraStep=32
CenterX=125
CenterY=50

[Rainmeter]
Update=1000
AccurateText=1
DynamicWindowSize=1
BackgroundMode=2
SolidColor=0,0,0,1

---Meters---

[FreeForm]
Meter=Shape
Shape =Path FreePath | Extend ColorModifiers,ScaleModifiers
Shape2=Path FreePath | Extend ColorModifiers,ScaleModifiers2
Shape3=Path FreePath | Extend ColorModifiers,ScaleModifiers3
Shape4=Path FreePath | Extend ColorModifiers,ScaleModifiers4
Shape5=Path FreePath | Extend ColorModifiers,ScaleModifiers5
Shape6=Path FreePath | Extend ColorModifiers,ScaleModifiers6
Shape7=Path FreePath | Extend ColorModifiers,ScaleModifiers7
Shape8=Path FreePath | Extend ColorModifiers,ScaleModifiers8
Shape9=Path FreePath | Extend ColorModifiers,ScaleModifiers9
FreePath=0,0 | LineTo 200,0 | ArcTo 200,100 | CurveTo 0,0,100,100
ColorModifiers =StrokeWidth 0 | Stroke Color 41,4,2,255 | Fill Color 87,149,212,#TraStep#
ScaleModifiers =Scale 1.00,1.00,(#CenterX#),(#CenterY#)
ScaleModifiers2=Scale 0.98,0.98,(#CenterX#),(#CenterY#)
ScaleModifiers3=Scale 0.96,0.96,(#CenterX#),(#CenterY#)
ScaleModifiers4=Scale 0.94,0.94,(#CenterX#),(#CenterY#)
ScaleModifiers5=Scale 0.92,0.92,(#CenterX#),(#CenterY#)
ScaleModifiers6=Scale 0.90,0.90,(#CenterX#),(#CenterY#)
ScaleModifiers7=Scale 0.88,0.88,(#CenterX#),(#CenterY#)
ScaleModifiers8=Scale 0.86,0.86,(#CenterX#),(#CenterY#)
ScaleModifiers9=Scale 0.84,0.84,(#CenterX#),(#CenterY#)
DynamicVariables=1
You do not have the required permissions to view the files attached to this post.
-
Hagart
- Posts: 12
- Joined: October 18th, 2023, 11:44 am
Re: Multiple containers
Wow, thats really advanced. I will try this also. Thanks a lot.Yincognito wrote: ↑December 5th, 2023, 4:13 pm No problem, you're welcome. Using a set of images will guarantee the result as you want it.
Just for the record, a way to workaround / simulate this using multiple Shape options in the same meter is also possible if you scale those ShapeN coordinates gradually and draw them with a lower alpha (I just took the 2nd example here and applied the principle, for simplicity):Result:Code: Select all
[Variables]
TraStep=32
CenterX=125
CenterY=50

[Rainmeter]
Update=1000
AccurateText=1
DynamicWindowSize=1
BackgroundMode=2
SolidColor=0,0,0,1

---Meters---

[FreeForm]
Meter=Shape
Shape =Path FreePath | Extend ColorModifiers,ScaleModifiers
Shape2=Path FreePath | Extend ColorModifiers,ScaleModifiers2
Shape3=Path FreePath | Extend ColorModifiers,ScaleModifiers3
Shape4=Path FreePath | Extend ColorModifiers,ScaleModifiers4
Shape5=Path FreePath | Extend ColorModifiers,ScaleModifiers5
Shape6=Path FreePath | Extend ColorModifiers,ScaleModifiers6
Shape7=Path FreePath | Extend ColorModifiers,ScaleModifiers7
Shape8=Path FreePath | Extend ColorModifiers,ScaleModifiers8
Shape9=Path FreePath | Extend ColorModifiers,ScaleModifiers9
FreePath=0,0 | LineTo 200,0 | ArcTo 200,100 | CurveTo 0,0,100,100
ColorModifiers =StrokeWidth 0 | Stroke Color 41,4,2,255 | Fill Color 87,149,212,#TraStep#
ScaleModifiers =Scale 1.00,1.00,(#CenterX#),(#CenterY#)
ScaleModifiers2=Scale 0.98,0.98,(#CenterX#),(#CenterY#)
ScaleModifiers3=Scale 0.96,0.96,(#CenterX#),(#CenterY#)
ScaleModifiers4=Scale 0.94,0.94,(#CenterX#),(#CenterY#)
ScaleModifiers5=Scale 0.92,0.92,(#CenterX#),(#CenterY#)
ScaleModifiers6=Scale 0.90,0.90,(#CenterX#),(#CenterY#)
ScaleModifiers7=Scale 0.88,0.88,(#CenterX#),(#CenterY#)
ScaleModifiers8=Scale 0.86,0.86,(#CenterX#),(#CenterY#)
ScaleModifiers9=Scale 0.84,0.84,(#CenterX#),(#CenterY#)
DynamicVariables=1
Contour Gradient.jpg
Pretty close to an acceptable outcome, given the scale and alpha steps are low enough. A bit more effect in certain areas, but that's probably because of the different formulas (Pythagoras'd be like "I told you so") representing the distance from the various points to the shape's center.
-
Yincognito
- Rainmeter Sage
- Posts: 7178
- Joined: February 27th, 2015, 2:38 pm
- Location: Terra Yincognita
Re: Multiple containers
It's not that advanced, the Extend... constructs are in this case just an alternative / equivalent to copy pasting the same line with a different Scale once you defined your Path, really:
Code: Select all
ShapeN=Path FreePath | StrokeWidth 0 | Stroke Color 41,4,2,255 | Fill Color 87,149,212,32 | Scale ...,...