It is currently April 23rd, 2024, 6:11 am

MirageWeather

Weather skins
User avatar
balala
Rainmeter Sage
Posts: 16162
Joined: October 11th, 2010, 6:27 pm
Location: Gheorgheni, Romania

MirageWeather

Post by balala »

  • Version 2.1 is available here. It has a rounded temperatures charts.
  • Version 2.2 is available here. You can follow the weather conditions for more locations (up to five), into one single skin.
MirageWeather6.png


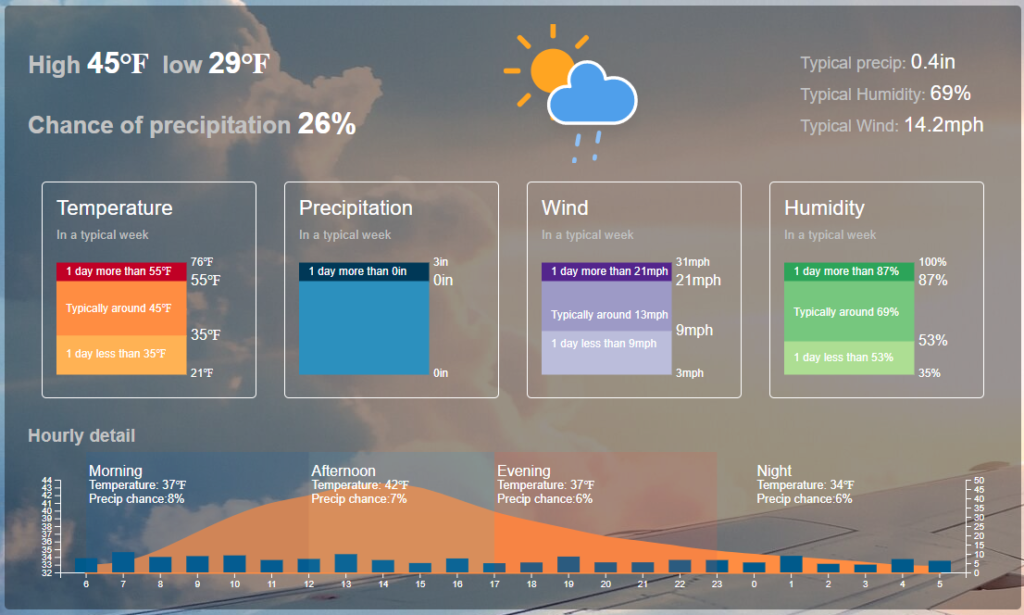
As part of my Mirage suite, this skin, now published as a standalone skin, has something which I didn't see on such skins. I'm talking about the lowest and largest temperatures evolution chart. The evolution of these temperatures from today up to three day ahead, are shown with a red (for lowest temperatures) and a green (for largest temperatures) line.
A few explanations are needed related to this skin, I think:
After installing, the Weather tab of the Settings skin opens.
MirageWeatherSettings1.png
For first, you should have to set a location, which can be done in more ways:
  • The simplest solution is to click the Detect button (on the mentioned Weather tab). If you click it, the skin will try to detect your location and if it succeeds, the found location appears on this tab. Even if this is a very simple and convenient solution, the tool doesn't succeed every time in properly detect the location. If it fails, follow the next step.
  • You can try to enter the name of your location into the City field. When you hit Enter, the skin will look for the entered location, showing up to ten of the found locations, into a panel. Click the location you want to use, then click OK.
  • If none of the above solution work (rare cases, but not impossible), you can manually enter a location (in the City field), and set the geographical latitude and longitude, into the Latitude and Longitude fields and set the proper hemisphere (North - South and East - West, respectively), in the right placed drop-down menus. To set the numeric values of the coordinates, you can:
    • Click the field and enter the coordinate, as a decimal number.
    • Scroll the mouse wheel on any of these fields. The fifth decimal of the coordinate varies.
    • If when scrolling, you keep hold down the CTRL key on your keyboard, the coordinate varies by tenth of a unit.
    • If you hold down the ALT key, the variation is by the third decimal (so by one thousandth of a unit).
Apart from the setting of location, you can set a few more things, namely the following ones:
  • On the General tab, you can set the followings:
    • Language, in the Choose language drop-down menu. Right now you can choose from the following languages:
      • English (default).
      • German - translated by Fazal Haider. Many thanks to him.
      • Romanian (own work).
      • Hungarian (own work).
    • Scale, on the Set scale field. Use the wheel of your mouse to set the desired value. Same way as for the geographical coordinates, you can:
      • Click the field and enter the desired scale, as number.
      • Scroll the wheel of mouse, for a variation of one hundredth.
      • Hold down the ALT key while scrolling, for a variation by tenth of unit.
      • Hold down the CTRL key while scrolling, for a variation by unit.
      • Right click the field, to set the scale to 1.
      When you set a scale, clicking the Test button on the right side of the field, tests the set value, by resizing the Weather skin (if it is activated). Right clicking the same Test button, resizes the Settings skin. These resizes are temporary and are not applied effectively (for instance by refreshing any of these skins, you get back the previously set scaling).
    • Set radius of corners of buttons and backgrounds - set the radius of corners of all rounded elements, like backgrounds and buttons, between 0 (not-rounded, square corners) and 10.
    • Show update date and time checkbox - if checked you'll see on the Weather skin the date and time of the last update of weather data (last time when the skin acquired the information).
    • Show ToolTips - if checked all tooltips are shown when hovering the mouse over any element of any of the two skins.
    • Show Mirage logo on background of skins - if checked, you can see the Mirage logo on both skins.
    • Default settings button - if clicked, the skin gets the default settings, which can or can not be applied (with one of the OK, Apply or Cancel buttons).
    • Set English button (not translated) - when clicked, the skin sets the default English language. This button might be useful if you set a not-known language from the list and apply it accidentally.
  • Clock & Date tab:
    • Clock setting:
      • Hour format: choose between the 12-hour or the 24-hour format. If you chose 12-hour format, you can check a checkbox, to show (or hide) AM / PM. If it's not checked, this information is not shown, getting only the hour, minute and eventually second (accordingly to the Show seconds setting - see below).
      • Show second - if checked the skins shows the second, otherwise showing only the hour and minute.
      • Show leading zeros - shows / hides the leading zeros on times (for dates there is another setting for leading zeros - see little bit below).
      • Show the time - if checked, you get the current time on the upper left corner of the skin.
    • Date settings:
      • Date format - choose the desired format for dates, from the dropdown menu.
      • Date divider charater - choose the character used as date divider (the character shown between day, mont and year). For this you have another dropdown menu, from which you can choose from the followings: -, ., / or space.
      • Show leading zeros - shows / hides the leading zeros on dates, distinctively from the leading zeros of times (which has to be set above).
      • Yesterday / today instead of date - if checked, for dates of today and yesterday, the Today and Yesterday terms are displayed, instead of the date. For other days, dates are shown, in accord of the settings.
      • Show elapsed minutes instead of date and time - if checked the skins shows the elapsed number of minutes, instead of time, assuming this number doesn't exceed the limit. The limit can be set by clicking the | button on the right of this setting. Clicking this button opens a panel in which you can set the limit, either by the left sided field (only by clicking the up and down buttons), or by clicking any of the four existing buttons, to set the limit to 1, 2, 3 or 4 hours. If any setting has been done, click either OK (to accept the setting) or Cancel to reject it.
        • Note: the last two settings are applying only to the Last update element of the skin, and have effect only if the Show update date and time checkbox is checked on the General tab.
      • Show the date - if checked, you get the current date on the upper left corner of the skin, below the time.
  • Weather tab:
    • Besides setting the location (as described above), there are some other settings available as well. Here they are:
      • Temperature and distance unit - a dropdown menu, to choose the unit you want to use for temperatures and distances. You have the following possibilities to choose from:
        • Metric - temperatures in Celsius degrees, distances in kilometers.
        • Imperial - temperatures in Fahrenheit degrees, distances in miles.
        • Hybrid - temperatures in Celsius degrees, distances in miles.
      • City - the name of the city / location for which the weather information are shown. This field can be used to enter the name of the city for which you want to search the location. If you enter a new name, when hitting Enter, a list of the found locations are displayed and you can choose from this one (as described above).
      • Show weather alerts - if checked the skin shows the weather alerts.
      • Show animated rain / snow - if checked the skin shows animation for rain and snowfall, when it's the case.
      • Show min & max temperature chart - if checked you'll see the chart of low (red) and high (green) temperature evolution for today and the upcoming three days.
      • The location settings have been explained detailly above.
When you finish with all desired / needed above settings, you can click one of the following three buttons:
  • OK - to apply all settings and close the Settings skin. The settings are saved to the drive and applied.
  • Apply - to apply all settings, without closing the Settings skin. The settings are saved to the drive and applied, but this Settings skin is kept on screen (can be used to tryo out different settings).
  • Cancel - all settings are discarded and the Settings skin is closed.
Complicated? I hope it's not. Just tried to make this skin as much customizable as I could. Hope you'll enjoy it.

If anyone is interested in translating to any other language, I'm waiting a PM. Many thanks anticipately. There are 127 sentences to translate.
You do not have the required permissions to view the files attached to this post.
User avatar
Lieuallen
Posts: 50
Joined: June 8th, 2020, 11:56 pm
Location: Chapel Hill, NC (US)

Re: MirageWeather

Post by Lieuallen »

I've not seen this graphical presentation of the predicted high and low temperatures before. I really like it -- nice work!
Always sure, sometimes right.
User avatar
balala
Rainmeter Sage
Posts: 16162
Joined: October 11th, 2010, 6:27 pm
Location: Gheorgheni, Romania

Re: MirageWeather

Post by balala »

Lieuallen wrote: May 29th, 2023, 11:07 pm I've not seen this graphical presentation of the predicted high and low temperatures before. I really like it -- nice work!
Thanks and am glad if you like it. I didn't see it either, this why I created it. But it's not new, has been included in all Mirage suites so far.
User avatar
Yincognito
Rainmeter Sage
Posts: 7148
Joined: February 27th, 2015, 2:38 pm
Location: Terra Yincognita

Re: MirageWeather

Post by Yincognito »

This is nice, it actually gives me some ideas on what could be averaged in my Weather skin as well (was planning on adding an average line in my skins, but had some doubts on what could possibly be the target in a weather skin). I know it's not quite that, but still nice and useful. :thumbup:

That being said, both the vertical and horizontal positioning of the dots is interesting, as well as the "z order" of the lines compared to the images and the text. Just curious, have you considered a more "gentle" or even "rounder" / more "fluent" touch for either the "line" or the "histogram", that would still be noticeable but not affect the beauty of the images or the writing? One random example, for reference (though I was thinking of a more faded style):
Image

Just trying to help in making the most out if it - feel free to disregard if you think it wouldn't be suited. I wouldnt want to give you bad ideas and such... :oops:
Profiles: Rainmeter ProfileDeviantArt ProfileSuites: MYiniMeterSkins: Earth
User avatar
balala
Rainmeter Sage
Posts: 16162
Joined: October 11th, 2010, 6:27 pm
Location: Gheorgheni, Romania

Re: MirageWeather

Post by balala »

Yincognito wrote: May 30th, 2023, 9:57 am This is nice, it actually gives me some ideas on what could be averaged in my Weather skin as well (was planning on adding an average line in my skins, but had some doubts on what could possibly be the target in a weather skin). I know it's not quite that, but still nice and useful. :thumbup:
Thanks for the appreciations. What to be shown in the chart, depends on what you want to show. Just have to have an idea on what to do.
Yincognito wrote: May 30th, 2023, 9:57 am That being said, both the vertical and horizontal positioning of the dots is interesting,
Not sure I really understand what you mean by this.
Yincognito wrote: May 30th, 2023, 9:57 am as well as the "z order" of the lines compared to the images and the text.
If by this you mean the order of those elements, I thought the icons should be bottom. The chart should be above the icons, this way the icons not would not cover the chart. And finally, topmost should be the temperature values, to can always see them easily.
Yincognito wrote: May 30th, 2023, 9:57 am Just curious, have you considered a more "gentle" or even "rounder" / more "fluent" touch for either the "line" or the "histogram", that would still be noticeable but not affect the beauty of the images or the writing?
Alright, but but how could be this done? I'm not sure.
Yincognito wrote: May 30th, 2023, 9:57 am Just trying to help in making the most out if it - feel free to disregard if you think it wouldn't be suited. I wouldnt want to give you bad ideas and such... :oops:
Yep, I understand you and appreciate all comments.
User avatar
ikarus1969
Posts: 571
Joined: February 28th, 2011, 3:20 pm
Location: Vienna, Austria

Re: MirageWeather

Post by ikarus1969 »

Hi balala,

i corrected the german messages file for some of the strings sound funny in my ears :welcome:

feel free to include it in your skin.
Messages2.inc
You do not have the required permissions to view the files attached to this post.
User avatar
Yincognito
Rainmeter Sage
Posts: 7148
Joined: February 27th, 2015, 2:38 pm
Location: Terra Yincognita

Re: MirageWeather

Post by Yincognito »

balala wrote: May 30th, 2023, 6:37 pmNot sure I really understand what you mean by this.
I meant that the points aren't horizontally centered in their day area (I see now that it's because of the "today" area, of which only the rightside is displayed) and lower temperatures are vertically positioned in a way that doesn't leave room for negative values (again, I now see that you're using the period's maximum and minimum temps as top and bottom bounds, and not some absolute values like -80C and +50C). At the time of my previous post, I wasn't aware of the reasoning behind those choices, but they make sense now.
balala wrote: May 30th, 2023, 6:37 pmIf by this you mean the order of those elements, I thought the icons should be bottom. The chart should be above the icons, this way the icons not would not cover the chart. And finally, topmost should be the temperature values, to can always see them easily.
balala wrote: May 30th, 2023, 6:37 pmAlright, but but how could be this done? I'm not sure.
I thought of having the temperature evolution at the bottom, drawn as either half transparent filled or not filled quadratic or cubic curves (ideally cubic), in order to smooth their appearance (similar to the "hourly details" in the image I posted above). This should be possible, judging by the B(t) formula here or the T1 / T2 formulas here that can be applied to get the ControlX1, ControlY1 / ControlX1, ControlY1, ControlX2, ControlY2 parameters needed for the quadratic / cubic curves in the Shape meters to pass through the dots in your graph (somewhat similar to the code below, where imperfect horizontal control points have been applied for simplicity - click to compare):

Code: Select all

[Variables]
; Horizontal (X) and Vertical (Y) points of Origin (O) [the (0,0) graph point] | High (H) and Low (L) temperature Overall (O)
XO=3
YO=57
HO=30
LO=5
; High (H) and Low (L) temperatures from Current (1) to Forecast (4) days [skin preview values]
H1=26
L1=13
H2=19
L2=8
H3=16
L3=11
H4=18
L4=13
; High (H) and Low (L) temperatures from Current (1) to Forecast (4) days [some various values]
; H1=25
; L1=12
; H2=27
; L2=14
; H3=27
; L3=13
; H4=20
; L4=9

[Rainmeter]
Update=1000
AccurateText=1
DynamicWindowSize=1

---Meters---

[Background]
Meter=Shape
Shape=Rectangle 5,92,212,57 | StrokeWidth 0 | Stroke Color 0,0,0,0 | Fill Color 0,0,0,128
LeftMouseUpAction=[!ToggleMeter GraphLines][!ToggleMeter GraphCurve][!Redraw]

[GraphLines]
Meter=Shape
X=5
Y=92
Shape =Path HPathL | StrokeWidth 2 | Stroke Color 0,255,0,255 | Fill Color 87,149,212,0
HPathL=(#XO#+65*0),(#YO#-#YO#/(#HO#-#LO#)*(#H1#-#LO#)) | LineTo (#XO#+65*1),(#YO#-#YO#/(#HO#-#LO#)*(#H2#-#LO#)) | LineTo (#XO#+65*2),(#YO#-#YO#/(#HO#-#LO#)*(#H3#-#LO#)) | LineTo (#XO#+65*3),(#YO#-#YO#/(#HO#-#LO#)*(#H4#-#LO#))
Shape2=Path LPathL | StrokeWidth 2 | Stroke Color 255,0,0,255 | Fill Color 87,149,212,0
LPathL=(#XO#+65*0),(#YO#-#YO#/(#HO#-#LO#)*(#L1#-#LO#)) | LineTo (#XO#+65*1),(#YO#-#YO#/(#HO#-#LO#)*(#L2#-#LO#)) | LineTo (#XO#+65*2),(#YO#-#YO#/(#HO#-#LO#)*(#L3#-#LO#)) | LineTo (#XO#+65*3),(#YO#-#YO#/(#HO#-#LO#)*(#L4#-#LO#))

[GraphCurve]
Hidden=1
Meter=Shape
X=5
Y=92
Shape =Path HPathC | StrokeWidth 2 | Stroke Color 0,255,0,255 | Fill Color 87,149,212,0
HPathC=(#XO#+65*0),(#YO#-#YO#/(#HO#-#LO#)*(#H1#-#LO#)) | CurveTo (#XO#+65*1),(#YO#-#YO#/(#HO#-#LO#)*(#H2#-#LO#)),(#XO#+65*0.5),(#YO#-#YO#/(#HO#-#LO#)*(#H1#-#LO#)),(#XO#+65*0.5),(#YO#-#YO#/(#HO#-#LO#)*(#H2#-#LO#)) | CurveTo (#XO#+65*2),(#YO#-#YO#/(#HO#-#LO#)*(#H3#-#LO#)),(#XO#+65*1.5),(#YO#-#YO#/(#HO#-#LO#)*(#H2#-#LO#)),(#XO#+65*1.5),(#YO#-#YO#/(#HO#-#LO#)*(#H3#-#LO#)) | CurveTo (#XO#+65*3),(#YO#-#YO#/(#HO#-#LO#)*(#H4#-#LO#)),(#XO#+65*2.5),(#YO#-#YO#/(#HO#-#LO#)*(#H3#-#LO#)),(#XO#+65*2.5),(#YO#-#YO#/(#HO#-#LO#)*(#H4#-#LO#))
Shape2=Path LPathC | StrokeWidth 2 | Stroke Color 255,0,0,255 | Fill Color 87,149,212,0
LPathC=(#XO#+65*0),(#YO#-#YO#/(#HO#-#LO#)*(#L1#-#LO#)) | CurveTo (#XO#+65*1),(#YO#-#YO#/(#HO#-#LO#)*(#L2#-#LO#)),(#XO#+65*0.5),(#YO#-#YO#/(#HO#-#LO#)*(#L1#-#LO#)),(#XO#+65*0.5),(#YO#-#YO#/(#HO#-#LO#)*(#L2#-#LO#)) | CurveTo (#XO#+65*2),(#YO#-#YO#/(#HO#-#LO#)*(#L3#-#LO#)),(#XO#+65*1.5),(#YO#-#YO#/(#HO#-#LO#)*(#L2#-#LO#)),(#XO#+65*1.5),(#YO#-#YO#/(#HO#-#LO#)*(#L3#-#LO#)) | CurveTo (#XO#+65*3),(#YO#-#YO#/(#HO#-#LO#)*(#L4#-#LO#)),(#XO#+65*2.5),(#YO#-#YO#/(#HO#-#LO#)*(#L3#-#LO#)),(#XO#+65*2.5),(#YO#-#YO#/(#HO#-#LO#)*(#L4#-#LO#))
That being said, even though the result would probably be the desired one, it's probably an unnecessary complication (they're not that difficult formulas, but initially I thought they would be simpler).
Profiles: Rainmeter ProfileDeviantArt ProfileSuites: MYiniMeterSkins: Earth
User avatar
balala
Rainmeter Sage
Posts: 16162
Joined: October 11th, 2010, 6:27 pm
Location: Gheorgheni, Romania

Re: MirageWeather

Post by balala »

Yincognito wrote: May 31st, 2023, 6:11 pm I meant that the points aren't horizontally centered in their day area
I didn't even want to horizontally center them, because it seems much better this way. At least this is my opinion about this.
Yincognito wrote: May 31st, 2023, 6:11 pm and lower temperatures are vertically positioned in a way that doesn't leave room for negative values (again, I now see that you're using the period's maximum and minimum temps as top and bottom bounds, and not some absolute values like -80C and +50C). At the time of my previous post, I wasn't aware of the reasoning behind those choices, but they make sense now.
Yep, right, lowest and highest values are not absolute values. I'm glad if you think it makes sense.
Yincognito wrote: May 31st, 2023, 6:11 pm I thought of having the temperature evolution at the bottom, drawn as either half transparent filled or not filled quadratic or cubic curves (ideally cubic), in order to smooth their appearance. This should be possible, judging by the B(t) formula here or the T1 / T2 formulas here that can be applied to get the ControlX1, ControlY1 / ControlX1, ControlY1, ControlX2, ControlY2 parameters needed for the quadratic / cubic curves in the Shape meters to pass through the dots in your graph. That being said, even though the result would probably be the desired one, it's probably an unnecessary complication (they're not that difficult formulas, but initially I thought they would be simpler).
Good idea. But unfortunately right now I'm not familiar enough how that curve could be created. Don't say it's not possible, it definitely can, but I need time to study it a little bit. So, this will be a further plan. However thanks for the suggestion, let's see how can I implement it.
User avatar
balala
Rainmeter Sage
Posts: 16162
Joined: October 11th, 2010, 6:27 pm
Location: Gheorgheni, Romania

Re: MirageWeather

Post by balala »

ikarus1969 wrote: May 31st, 2023, 9:31 am i corrected the german messages file for some of the strings sound funny in my ears :welcome:

feel free to include it in your skin.
Thanks. Just downloaded your file and will include it into the next release.
User avatar
Yincognito
Rainmeter Sage
Posts: 7148
Joined: February 27th, 2015, 2:38 pm
Location: Terra Yincognita

Re: MirageWeather

Post by Yincognito »

balala wrote: May 31st, 2023, 6:24 pm I didn't even want to horizontally center them, because it seems much better this way. At least this is my opinion about this.
Ah, ok - no problem at all. This came to me after looking at your preview screenshot, where due to how points are positioned, it seemed at first that the lowest red point incorrectly referred to the 11 degree value (because it's closer to the point), when it actually corresponds to the 8 degree one (which is farther from the point) - at least that was my initial visual impression. Of course, once you're used to the positional style, it becomes less confusing.
balala wrote: May 31st, 2023, 6:24 pm Good idea. But unfortunately right now I'm not familiar enough how that curve could be created. Don't say it's not possible, it definitely can, but I need time to study it a little bit. So, this will be a further plan. However thanks for the suggestion, let's see how can I implement it.
I was in the process of implementing the T1 / T2 formulas, but stopped because it seemed to give longer than desired formulas (at least for my taste) in native Rainmeter. That being said, in Lua it would be as easy as converting the Javascript code on that page to Lua in a function and providing the out_tangent_1.x / out_tangent_1.y / out_tangent_2.x / out_tangent_2.y values as the ControlX1 / ControlY1 / ControlX2 / ControlY2 for the cubic curve Shape meter. The only question is whether the control points for the beginning and end dot in the graph should be simulated, because to the coordinates of a control point require knowledge of at least 3 graph point coordinates.

P.S. It's my first time working with curve Shape meters too, but I kinda like it... :D :oops:
Profiles: Rainmeter ProfileDeviantArt ProfileSuites: MYiniMeterSkins: Earth